A JavaScript library to help with common forms of interactivity in the Tumult Hype HTML5 editor.
Status: Early Beta
License: Open Source (MIT)
Note: Requires jQuery 1.8+
Setup
- Include jQuery in your Hype resource library
- Include hypester.js in your Hype resource library
- Call the appropriate functions below
Features
Initializing a new scene
To initialize a new scene, create a timeline action on the first frame that calls this function with your scene settings:
hypester.init ({
    hype: hypeDocument,                 // a copy of the hypeDocument object
    hidden_elements: 2,                 // how many hidden elements to find in the scene
    alert_timeline: 'alert-incomplete', // the timeline of the alert message
    next_scene: 'next',                 // the next scene to load
    completed: false                    // mark the activity not completed
});
This does several things:
- If a
#scene-namehash is added to the end of a URL, it will jump to that scene immediately. - Initializes the number of hidden elements to find in the scene, for use with
hypester.next(). - Initializes the scene history for dynamic "Previous" buttons in branching scenes.
If no hidden elements are present in the scene, the defaults should not cause any behaviour issues for other scene types. Alternately, you can use the shorter form of the function call like this:
hypester.init ({hype: hypeDocument});
Navigating to a specific scene from another file
To send a user to a specific scene within a Hype file, make sure the file you're
navigating to uses the hypester.init() function in the first scene, then link
to it with the scene name in the URL's inner anchor value, like this:
my-hype-activity.html#scene-name
Triggering the next scene
To trigger the next scene, while ensuring all elements were clicked and/or the activity has been marked completed, attach a callback action to the "Next" button that calls this function:
hypester.next (hypeDocument);
Marking the scene completed
Trigger this when the activity has been completed so hypester.next() knows to
continue to the next scene.
hypester.completed ();
Marking a hidden element as clicked
To mark a hidden element as clicked, call this in a callback function on the mouse click event for each element, numbering them from 0 to 11 (instead of 1 to 12):
hypester.clicked (0);
Go to the previous scene in a branching scenario
To go to the previous scene in the history of a branching scenario, attach a callback action to your "Previous" button that calls this function:
hypester.previous (hypeDocument);
Creating drag and drop activities
Use the hypester.drag_handler() and hypester.drag_completed() functions to
create drag and drop activities with multiple dropzones per draggable element,
one or more of which are the correct choice.
Step 1. Initialize the scene
Initialize the scene on the first keyframe of the Main Timeline like this:
hypester.init ({
    hype: hypeDocument,
    element: element,
    event: event,
    draggable: {
        elements: 4,
        completed_timeline: 'complete',
        dropzones: [
            { id: 'drop1' },
            { id: 'drop2' },
            { id: 'drop3' },
            { id: 'drop4' }
        ]
    }
});
Specify the number of draggable elements in the elements setting, and a timeline
that should be run when all of the elements have been dropped into the correct dropzone.
This timeline will be triggered by hypester.drag_completed() only when all of the
elements have been dropped correctly.
Each dropzone has an id setting that should match an element's Unique Element ID
field in the Hype Inspector, which you will need to set manually. A dropzone may also
have bg_off and bg_on settings which are used to toggle the background image of
the element when a draggable element hovers over it. The images should be loaded into
your Hype Resources. For example:
{ id: 'drop1', bg_off: 'drop1_off.png', bg_on: 'drop1_on.png' }
Step 2. Make your elements draggable
On each draggable element, open the Hype Inspector and add two On Drag actions:
-
Control Element Positionto enable drag and drop -
Run Javascriptand create a new function
Call the following in your newly created function:
hypester.drag_handler ({
    hype: hypeDocument,
    element: element,
    event: event,
    correct_answer: 'drop2',
    correct_timeline: 'correct',
    incorrect_timeline: 'incorrect',
    reset_timeline: 'reset_drag1'
});
The correct_answer is the ID of the dropzone or list of IDs of the dropzones
that are considered correct choices. To specify a list, set it to an array, e.g.,
['drop2', 'drop3'].
The correct_timeline is a timeline that is played when the user drops an element
onto one of the correct dropzones.
The incorrect_timeline is a timeline that is played when the user drops an
element onto one of the other dropzones.
The reset_timeline is a timeline that is played when the user drops an element onto
anywhere except one of the correct dropzones to reset its position. At keyframe 0,
this timeline should pin the Origin (Left) and Origin (Top) properties to its
initial location in the scene.
Step 3. Check if the activity has been completed
In the last frame of your correct_timeline timeline(s), add a Timeline Action that
runs a new JavaScript function like this:
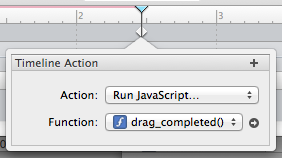
The function should contains the following code:
hypester.drag_completed (hypeDocument);
This will trigger the completed_timeline from hypester.init() only when all of
the draggable elements have been dropped on the correct dropzones.
Injecting dynamic text into Hype activities
Turn your Hype document into a template with dynamic text, image sources, and even form fields.
Step 1. Add your template tags
The text for a given element should contain a tag name of your choice in the form:
{tag_name}
This can also be included in image source fields:
<img src="{photo}" />
And in form input values:
<input type="text" name="input" value="{input}" />
Step 2. Create the hypester_labels object
Create a JavaScript file named hypester_labels.js that contains the following:
var hypester_labels = {
    tag_name: 'Hell World',
    photo: '/files/photo1.png',
    input: 'Placeholder text...'
};
Load this file into your Hype resource library.
Step 3. Call hypester.init()
In the first keyframe of the main timeline of your first scene, add a Timeline Action that calls this:
hypester.init({hype: hypeDocument});
If your hypester_labels.js file has been included, previewing in the browser should
replace the tags for you automatically.
Step 4. Interacting with the Hype document
If you want to update a value in hypester_labels, use the following:
hypester.update_element ('tag_name', 'New value');
This will update the value and propagate the change throughout your Hype document.
If you do update the hypester_labels properties directly through some other means,
you can propagate the changes across the whole file via:
hypester.update_elements ();
You can also create instances of the HypesterElement class that represent elements
that should always print the latest value of hypester_labels.some_property via:
var alert_msg = new HypesterElement ('alert_msg');
For example:
var hypester_labels = {
    alert_msg: 'The sky is falling'
};

var alert_msg = new HypesterElement ('alert_msg');
alert (alert_msg); // The sky is falling

hypester.update_element ('alert_msg', 'Everything will be okay';
alert (alert_msg); // Everything will be okay

hypester_labels.alert_msg = 'The sky is falling again';
alert (alert_msg); // The sky is falling again
A HypesterElement object can be used in place of any JavaScript string to keep its
value updated with the latest hypester_labels value every time it's referenced.